FIRST TECH CHALLANGE
Programming Tutorials
The FTC Java Library
While we use the regular parts of Java in FTC, there are also FTC specific commands that you need to know in order to program.
The Hardware Class
All FTC hardware needs to be declared before it can be used. While there are other ways to organize your code, in this lesson we will be creating a class with all of the hardware declarations in it. Let's look at an example:
Let's take a closer look:
This is how you would create hardware objects using Java in FTC
The names inside of the .get("") should be the same name as in the app's config.
Now you can reference the hardware class from any of your OpModes.


Creating a Config
When you want to run a robot, you need a config to tell the code what ports the motors correspond with. Configs are built from inside the FTC app, which you need to already have downloaded before making a config. All the names you give things in the configuration must be the EXACT SAME as the names you put in the code. This is vital, as otherwise the phone will not know what hardware devices to connect to the code you wrote.
Running Motors
Motors can be run in 2 different modes: with or without an encoder. An encoder will measure the current position of a motor and when you run with an encoder you run until the motor reaches a certain position. When you run without an encoder the motor will freely spin when given power. To set the mode run the method motor1.setMode() then give it one of the following parameters:
* DcMotor.RunMode.RUN_USING_ENCODER to use an encode,
* DcMotor.RunMode.RUN_WITHOUT_ENCODER to run without an encoder, and
* DcMotor.RunMode.STOP_AND_RESET_ENCODER to reset encoder values.
When using an encoder to set the desired motor position use the motor DcMotor.setTargetPostion(INTEGER). Then, regardless of whether you are running with or without an encoder, to set the power use the method DcMotor.setPower(DOUBLE). This power will be in a range between 0 and 1.
To learn about more methods for motor control you can look at the DcMotor JavaDoc: https://ftctechnh.github.io/ftc_app/doc/javadoc/index.html
Servo Programmers
There are two types of servos, continuous rotation and regular servos. In this lession we will focus on regular servos. These will run between a minimum and a maximum position which can be referenced in the code as anywhere between 0 and 1. To set the values of 1 and 0 on the servo, we need to use the servo programmer.
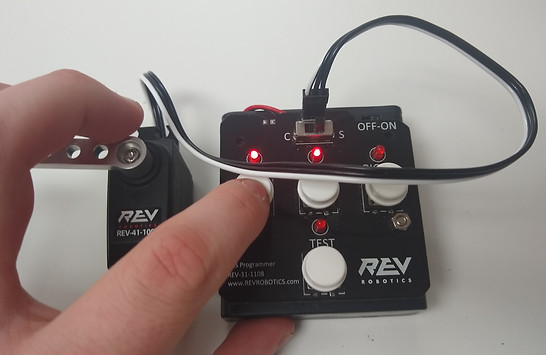
To use a rev servo programmer:
1. Plug the servo into the programmer and make sure the switch on the programmer is set to S (regular servo), not C/CR (continuous rotation).
2. Press the program button and move the encoder to left most position you want the servo to go, then press the left button. The limit must be in a certain part of the circle, as this is the limit of the degrees it can move. For our servo, the upper left quarter is the area. it may vary depending on your servo programmer, so it may take a lot of testing. If it blinks and doesn't stay on, then it is out of the limit. The same rule on the values applies to the next step.
3. Move the encoder to the other limit and press right button, then hit the program button again.
4. Now if you hit the test button, the servo should move between these 2 positions until you press it again.


Running a Servo
After you program the positions on a servo using a servo programmer, you can tell the servo to move to a position using your code. First create the servo in code,
Servo servo = hwMap.servo.get("servo");
Then, find the percentage from the left to the right you want the servo to move and set the servos position to that as a decimal
servo.setPosition(double position);
A value of 0 tells the servo to go as far counterclockwise as it can.
A value of 1 tells the servo to go as far clockwise as it can.
This means then that a value of 0.5 would move the servo directly to the middle of the two positions you set with the servo programmer.
